4 Ways to Get Better Reports by Comparing Attribution Settings
My favorite feature of Meta Ads Manager is comparing attribution settings. It helps troubleshoot problems, expose misleading results, and reveal impacts that default reporting cannot provide.
The problem is that not enough advertisers are actually using this feature. I dig into this data during almost every one-on-one meeting. This feature is part of my daily routine and I encourage you to make it part of yours too.
If you’re unfamiliar, click the “Columns” drop-down menu in Ads Manager. Near the bottom, you’ll find “Compare Attribution Settings.”
Once selected, you will get a menu like this…
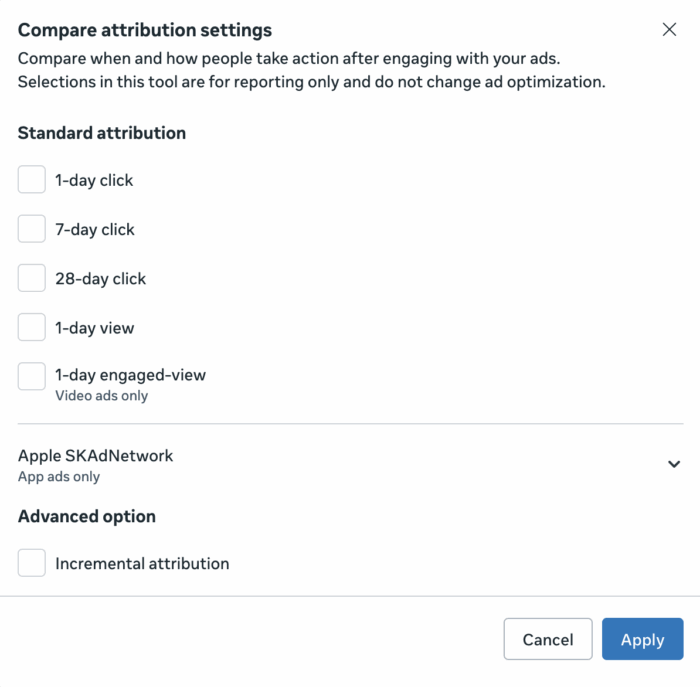
This is a collection of all the various attribution settings (“First Conversion” and “All Conversions” will appear when you click one of them). By checking any of these boxes, you will add a column to your report.
Default columns will report conversions based on the attribution settings defined in the ad set. If you don’t make any changes, it will be 7 days for clicks and 1 day for views. But adding these columns can provide enlightening information.
Here are my favorite ways to use this feature…
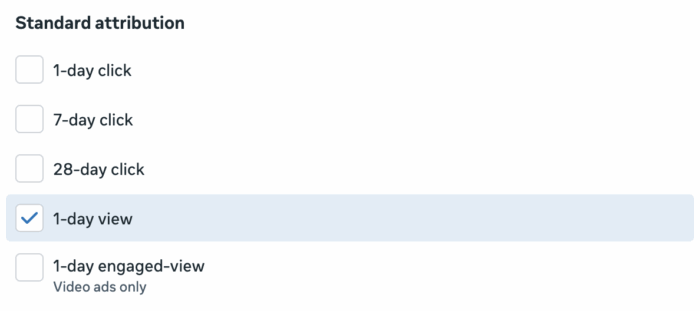
1. One-day browsing and remarketing
Whenever I talk to an advertiser who has a separate remarketing ad set and the results they are getting seem too good to be true, I instruct them to compare attribution settings. I would probably ask them to add columns for 7 day clicks and 1 day clicks, but most importantly a column for 1 day views.
I don’t have many results to use as examples since I personally don’t do a lot of remarketing these days, but here’s one…
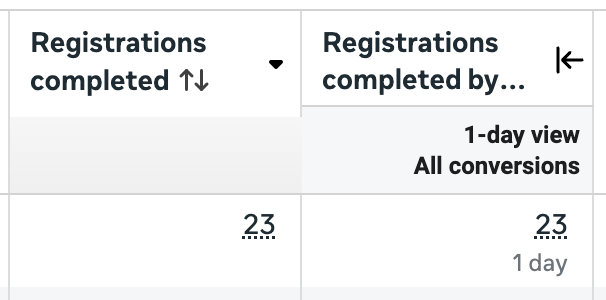
Every reported sign-up is the result of a view-through conversion. This means no one clicked on the ad before converting within 7 days. All 23 registrations occurred within one day of viewing (but not clicking) the ad.
This discrepancy isn’t always ridiculous, but my point is this: click-to-conversions more accurately reflect the impact of your ads than views. This is even more true when you do remarketing.
Since the ad serving algorithm is literal and Meta will do whatever it takes to get you more results, you can bet that it will capitalize on potential view-to-conversions when remarketing. You will get a lot.
If the ad is shown to people who are receiving your email or have already visited your website, they don’t need to click on the ad. They don’t even need to actually see them. View-through conversions are reported if they convert within a day.
I have a lot of problems with remarketing, and misleading results from view-through conversions is high on that list. Removing browsing results won’t completely solve these problems, but it will at least eliminate some of the most glaring errors in reporting.
For those who rely heavily on remarketing, seeing this can often be an eye-opener.
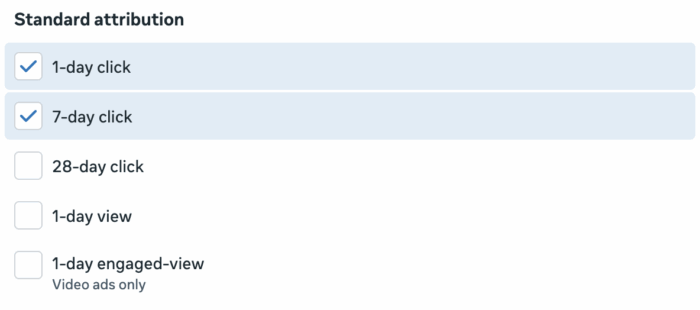
2. 1-day and 7-day click price difference
How long does the decision-making process take after your ad is clicked? You can start answering this question by creating separate columns for 1-day and 7-day clicks.
This will provide three columns for each conversion metric (including results if you are optimizing for conversions):
- Default report
- 1 day click
- 7 days click
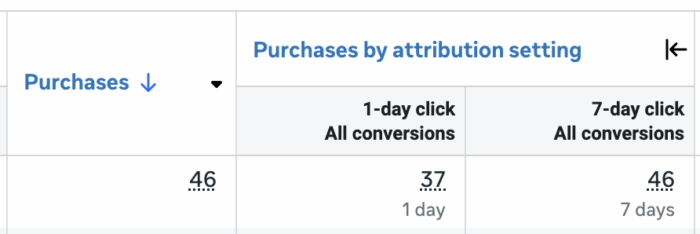
In the example above, 37 of the 46 purchases occurred within one day of clicking the ad, and 9 (46 minus 37) purchases converted between days 2 and 7. In this example, the vast majority of customers converted within a day. If it’s flipped, it’s probably because higher dollar products require more time to consider.
When using remarketing, you’ll also find that clicks are more concentrated over the 7 days. Someone clicks on your ad, but doesn’t convert, then sends an alert via email (or other platform) over the next few days. Your ad will still get positive feedback from the first click.
Again, clicks per day are the best indicator of your ad’s impact. Don’t discard 7 days of click results in any way, but they are more likely to have been helped (and you should help when possible!).
3. 28 days for clicks and leads post-purchase
Are your ads driving more purchases (or other conversions) than you thought? One way to spot this is to use 28 days of clicks.
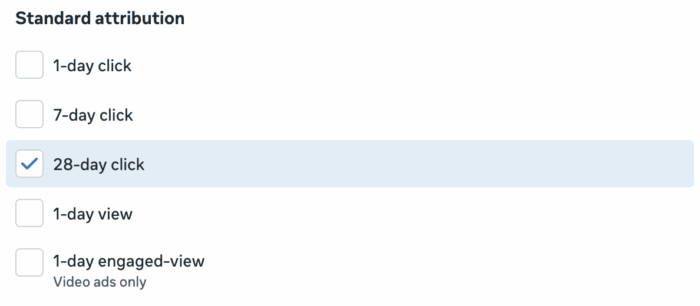
To reiterate, a 28-day click is not as valuable as a 1-day click. But this larger window helps highlight what people are doing outside of the default seven-day click window.
This is especially useful when running ads aimed at generating leads. Are you able to convert leads into paying customers within 28 days of a click (which is likely the window after joining your list)?
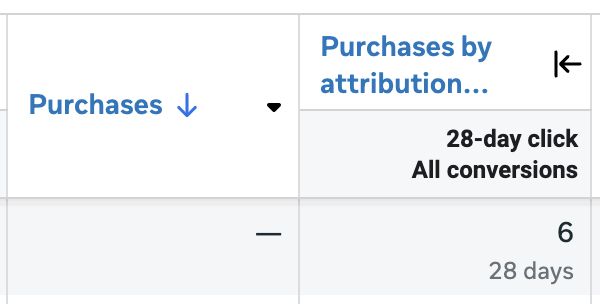
In the example above, no purchases will be reported by default. But when the window period was expanded to 28 days, six purchases occurred. This is useful information to know.
I have people come to me concerned that their lead generation advertising isn’t worth it. But once they make this comparison, they can see that they are actually making money using these leads.
4. First conversions and unique customers
After selecting any attribution window, you can select “First Conversion,” “All Conversions,” or both.
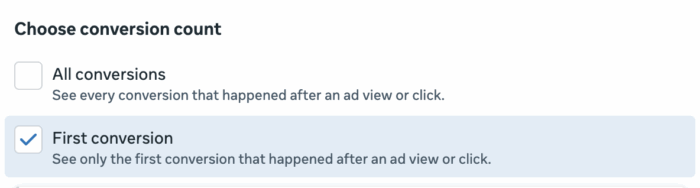
This highlights one of the most common misconceptions related to conversion reporting. By default (unless you use the “First Conversion” option in your ad set), Meta will report all conversions that someone makes within the attribution window. One person can perform multiple individual conversion events.
We assume a standard 7-day clicks and 1-day pageview scenario. Someone clicks on your ad and visits your website. They make purchases. Two days later, they returned and purchased again. By default, both purchases are reported. It doesn’t need to be the same product or product you are promoting.
This is where First Conversion can help resolve this potential reporting issue. When you add a “First Conversion” column, it will only reflect the first conversion someone makes within the attribution window. So in the example above, there is only 1 conversion, not 2.
Of course, it’s helpful to know whether someone made multiple purchases after seeing your ad. You want to know this. But first-time conversions are particularly useful for providing numbers closer to “unique customers.”
Let me illustrate this by providing an example using lead generation and full registration events. When someone subscribes to Cornerstone Advertising Tips, the confirmation page will include a cross-promotion from The Loop. As a result, I got quite a few people subscribing to both sites.
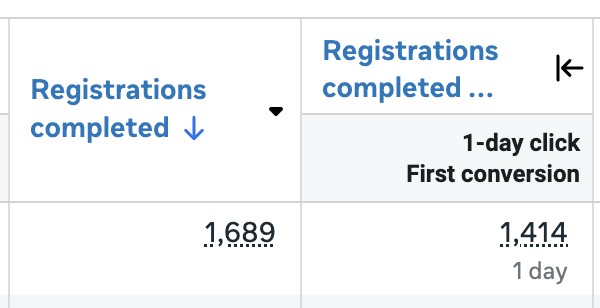
So in the example above, we can reasonably assume that my ad attracted 1,414 subscribers, but some of those people also subscribed to other content (usually The Loop).
Get clear conversion reporting
These are my four favorite ways to use the Compare Attribution Settings feature, but there are of course more. Most importantly, you should make it a regular part of your toolbox so that you can prioritize the context of your search results. What’s reported by default doesn’t tell the whole story.
How many of those conversions are view-through conversions? How many clicks are there in 1 day or 7 days? How many conversions are there compared to all conversions? Are there any conversions hiding outside of your attribution settings?
The most curious and experienced advertisers answer these questions every day, which helps them act.
now you
Do you have a favorite feature of Compare Attribution Settings that I didn’t list here?
Let me know in the comments below!


